Wednesday 26 June 2013

Feedback


Feedback From Professional People Attending Showcase


The following feedback for the Blue Route Multi-Story Water project was provided by professional people that attended the showcase at Shipley College:


Mick Learning Coach – “The Blue Route has more animation in and captures a mood that builds throughout the piece, pushed along by the music and the use of colours. Very good, with clear and interesting use of different scenes e.g. outdoors, trees/leaves buildings inside & outside.”

“Overall, I am chuffed for the students. The Digital Showcase gives them the opportunity to see the fruits of their labours, which must be a big bonus and not something that different courses can really do – nice for other students to see what the Media & Games course actually do!”


Hayley from Art & Design - “The students have clearly worked hard and were enthusiastic about their work which is great.”


Kaye Elling – Bradford University –“I thought the Robot Lama group had some very nice concept art. There is a colour drawing of one of the buildings which was particularly well observed. Please pass on my compliments to the team; they had some successful art direction in the videos. The lighting is especially good and the misty environment was very atmospheric.”


Stephen Bottoms – “By contrast, Robot Llama‘s Blue Route trailer goes more for the spooky thriller mood for its canal-side buildings including Hirst Lock and the Canal Company Warehouse.”


Thursday 13 June 2013

Unit 73, sound reflection

Once I had my finale animation for The united reformed church, shipley wharf and hirst lock I then upload them on to windows live movie maker, individualy, and using the sounds that me, Ali and Zak went out and recorded sound effects from the real world in the early year, I then put these sounds on to movie maker and extract the sounds I needed by each sound file and placed them into the right place I needed them to be in on the video.
I then went back into movie maker put the videos with the real sounds on and added another layer of sounds onto if they were extra sounds that needed to be added on.

My final audio product does meet my expertation, I got all the audio sounds that I expected to hear in the real life enviroments recorded and put on to my final animation.

I managed my time for the recording the effects by picking out a day for recording sound effect, I choose monday 1st period, mainly that was the best time to do it, and during in that time, 1 hour & 30 minutes, I used that time to go out and record sounds that I needed for my 3D enviroments. If I could organise my time better I would try and organise my days to go on an outing to record any more sounds on that I needed instead of rushing it and squeezing it all into one day.

The thing I had most trouble with was trying to record the right sound effects, because I couldn't create these sound effect, from the real world, they were all done by themself like for instance the river, I couldn't control the sounds that a river made, it does it all by itself and since I went out into the public that means that the public was out there making noises that I couldn't control when I was trying to record the sounds that I needed, which made it hard to get good quaility sounds I needed.

The bit I found easy on this was editing the sounds it was easy for me to pick out the sounds I needed/wanted and placed them were they needed to be on the video.

I would say the only thing that is professional about the finale animation is the fact that I added sound to it but the sound itself isn't professional, it isn't clear or pure or HD, the quality isn't good enought to be a professional, the sound itself doesn't sound as good as the real thing.

Other people thought that the sound that I adeed to my finale animation match the enviroment it was suppose to be in but they said that the sound wasn't as quiet as good as the real deal.

If i could improve my sound effects I would look into "foley" and create own my sound effects rather then trying record them in the real world were I have less control over the overall thing and I wouldn't have problems such as, poor quality sounds, interupting sounds and less control over what sounds that I need.

If I was to do things differently I would create my own sounds rather then recording them in the real world, this process would be alot easier and simplier in general.

What I learned that more work goes into a little thing then I thought and it isn't easy getting the sounds I needed and that you will have to make some compromises in order to get what you want.
I learned how to  record sounds using the given equipment given to me, it was a simple matter of record, stop and extract. 


Friday 26 April 2013

Sound stuff work


I got to play and experiment with the sound equipment (mixer, we basically messed around creating musical soundtracks, we got to choose different types of genres like pop & rock to play around with.
On this piece of software we got to choose from 10 different type of musical sounds from one of the genres and on this software we got to choose how we wanted the beat to go and have it on a loop, we also get add up to about nine more sounds  from the the choosen genre.
With this software we got to treat the whole software like an actual mix board, 
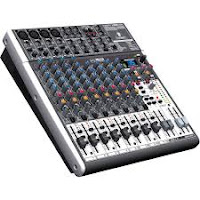
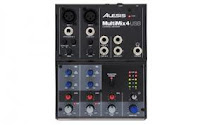
Alesis MultiMix 4 USB Four-Channel USB Mixer and a Mackie PROFX12 12-Channel Compact Effects Mixer with USB and a micro-
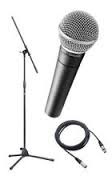
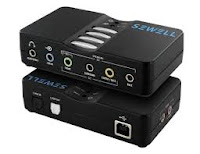
Shure SM58-LC Vocal Microphone Bundle with 20-Foot XLR Cable and Boom Stand, Sewell USB SoundBox 7.1 USB Sound Cardwe used a software called Audacity 1.3.  Christpher made it clear that food and water were to be no where near the equipment in case it caused the equipment to be damage.
phone sm 57 & 58, PC Monitor, Widescreen LED Monitor, Logitech Wireless Combination,
On the mixer chris showed us how to change the volume, the depth and how to make
it sound eckoie, learning this we learned how to disguise our voices.

I would first map out my enviroment look at them individualy and think carefully about what sort of sounds you might hear in each enviroment so for example you might here the sound of a car, laughter of children, a gush of wind as well as the sounds you might here
and
would also take into consideration how would they each sound in different surrondings. I would consider the fact since its a different enviroment that things would sound differently like how foot steps would sound different to walking on grass to tar-mac.

With music it has to suit the situation rather then it being totally random.

To create the sounds I need for this project I'm first gonna borrow a recording device from Shipley college(Yamaha pocketrak C24 pocket Recorder, is the type of device I was thinking of) and set out into the chosen environments and try to record some sounds that are heard in that area, while going out and recording sounds is one option I would try out Foley  I would one day bring in some random objects that are capable of creating the sounds that are heard in that chosen area and perhaps use them as an optional extra, or if all fails I would have to ex-track the sounds of the inter-web in order to get the desired sounds.
I would feel that it would be best to keep all recorded sounds as natural as possible to keep it all realist as possible but if say some recorded sounds don't sound the right level of volume then I would put it through some software in order to get the perfect pitch.

The Script
If scripts and narration are to be added I would suggest that in my team that I were to do it and what I would talk about is say a bit of history and information about the chosen area with maybe a bit of Hummer added to keep things interesting  while talking about the chosen areas I could inmate a voice to make it sound as if Sir Titus Salt was talking about the environment himself.


As you can see with each picture are picture of what components that I used in order to get my narration, a mixer table a computer that has software that specificly deals with sounds and a person called christopher dewey standing next to a micro-phone.

To start this process I'd click the black circle icon to start the process of recording the narration, I had chris read the scripit into the microphone and I requested that he read out loud in an old man voice to give off the effect that it was like Sir titus salt was reading it out, it was one of my aims I was trying to go for in the narration.

Chris was in a small room called the sound booth, he read my scripit into the micro-phone, the voice that he put on for this task I felt in my onisted opinion that he did the job perfectly.

Once I got the narration done I started to put the narration into my animation, one problem that I faced with it was that it was a bit hard to hear even when its on its loudest volume, it was a bit hard to hear, this caused more problems for me, because of this problem it made all the other sound that I applied on my animation hard to hear because I had to lower there volume enough so you could just hear narration as well as the other sound (sound effect, music) but on certain device with some head phone the noise level was well enough to hear.


The Music
If we were to put some sort of musical soundtrack into our project it would probaly be only background music, the music itself would have to suit what the project is, it can't be something out proportion, it can't be loudly epic and melo-dramatic, the music itself has to be what the project is otherwise it just won't suit it or fix in like jigsaw puzzle.

http://www.youtube.com/watch?v=0X9POuSI0Xs

The opening cinematic on this youtube link is and example of the way I would like to do this project in, on this video a man narrates over the video while the video plays it cuts to these different scenes in which the camera pans around them, this is a type of way i would like to do this.

In today's music lesson we got to have a play around with a mini key board and the software you use it on, while p[laying with it i discovered that there are sound formats that you can play with on the key board for example classic, the blues, hip-hop and ect. So when playing on this you will play with these types of gerners of music. while messing around with this technology I found that there is a honky tonk that you can use on the key board which is the type of music that our group was thinking of using for our clients video.


I would first map out my enviroment look at them individualy and think carefully about what sort of sounds you might hear in each enviroment so for example you might here the sound of a car, laughter of children, a gush of wind as well as the sounds you might here and would also take into consideration how they would the in each of these. I would consider the fact since its a different enviroment that things would sound differently like how foot steps would sound different to walking on grass to tar-mac.

With music it has to suit the situation rather then it being totally random.

For the type of video that we are presenting to our client I'm thinking that it should be calm, mellow, relax and pleasent, It can't be something loudly epic or mellow dramatic because the video isn't suited for that type of music, for the video to be perfect it has to have music that suits it best or what it is.

http://www.youtube.com/watch?v=M_0TRKtbbJk&playnext=1&list=PLC1F79AE4BCC77D60&feature=results_video

This link is an example of the type of music I was thinking about having in the video, its from the game halo combat evoled & halo CE anniversary, it suits it well because its carm and mellow because the video itself has no real gerne of anytype, no such real action at all that it can only be just soving.

http://www.youtube.com/watch?v=a40ZCFtUoLA

Another example, this one is from the game alan wake, basically I'm just getting at the same thing before, this has the same type of music I was looking for, the one that I feel personaly suits the video best.

http://www.youtube.com/watch?v=4Tr0otuiQuU

This example of music is Beethoven - Moonlight Sonata its a slightly different compared to the first two because it has a hint of depression in it but also sounds upper class, safisticated, smater and serious, playing this on our video would change the people views towards the video and make them feel that video does seem a bit upper class, safisticated, smarter and serious.

With any music that we put on this video will effect the audience feelings towards the video, so we can't have something depressing or boring otherwise they'll judge it as poor and we can't put anything to flamboint or outragous for what the video is, choosing the right type of music is key a tool imto proswading the audience into choosing our video as favourite.

http://www.youtube.com/watch?v=8Uo49IYAx3s

This example of music here is the type of music that is used in the type of style that my team were thinking of using, we discuss the idea of presenting it as a black & white silent movie and playing some honky tonk music which is the type of music that they played in those video's, my team thought this would be a good way to present this because we were presenting these historical landmarks and playing it as an old film would be a great way to present it.
If we presented it as a black & white movie we could cancel out any narratation and do it the same way as those black and white silent movies which would be to bring up a box of text instead of having a voice over actor doing it.

If we changed the way we would present our video then its possible that we could change the style of our music to something more exstravagant, for example if we were to present it as one of those action movies trailers in a way which would be to have some quick pan-shots of our different enviroments/flashing images or what not then we could changed the music to something more thrilling.

http://www.youtube.com/watch?v=cT8hilib_6Q&playnext=1&list=PL001A57588A6E955F&feature=results_video

This an example of the type of music that we could use if we presented it as an action movie trailer (inception-soundtrack)

To create the sounds I need for this project I'm first gonna borrow a recording device (TASCAM-DR07) from shipley college and set out into the choosen enviroments and try to record some sounds that are heard in that area, while going out and recording sounds is one option I would try out foley, I would one day bring in some random objects that are capable of creating the sounds that are heard in that choosen area and perhaps use them as an optional extra.
I would feel that it would be best to keep all recorded sounds as natural as possible to keep it all realist as possible but if say some recorded sounds don't sound the right level of volume then I would put it through some software in order to get the perfect pitch.

If scripits and narration are to be added I would suggest that in my team that I were to do it and what I would talk about is say a bit of history and infomation about the choosen area with maybe a bit of hughmer added to keep things intresting, while talking about the choosen areas I could imate a voice to make it sound as if Sir Titus Salt was talking about the enviroment himself.

If we were to put some sort of musical soundtrack into our project it would probaly be only background music, the music itself would have to suit what the project is, it can't be something out proportion, it can't be loudly epic and melo-dramatic, the music itself has to be what the project is otherwise it just won't suit it or fix in like jigsaw puzzle.

http://www.youtube.com/watch?v=0X9POuSI0Xs

The opening cinematic on this youtube link is and example of the way I would like to do this project in, on this video a man narrates over the video while the video plays it cuts to these different scenes in which the camera pans around them, this is a type of way i would like to do this.

http://www.youtube.com/watch?v=8Uo49IYAx3s

In our group we descussed a way that we could present our project, we thought that maybe we could present it as one of those black & white silent movies with the honky tonk piano music playing in the background, we thought of this idea because we thought it would give it more of a historical feature and as well as it being a uniqe idea. the youtube link above will give you an idea of the type of music we are gonna use for this idea. the youtube link below is just an example of a black & white movie just a type of style to put our project in.
http://www.youtube.com/watch?v=JVNSQ72wvlc

Thursday 25 April 2013

Robot Llama trailer project beta

This trailer isn't the final deal but rather something to show off, to give an idea to the people of where heading, this trailer consist of the animated video's of my own enviroments, I sliced and diced each video in movie maker and tried to mash them all up together to make it look like one of those profecinal movie trailers.
The idea I wanted for this trailer was to have quick pan shots like those movie trailers, so I made shore that each of my animations got a good chunk of shots of each enviroments and to make it seem awsome I add the inception theme tune-mind heist to it because its a true fact that adding the inception theme tune to anything make it sound awsome.
With the inception mind heist theme tune in mind I thought to try match some pan shots with the theme tune, so for example when you heard a certain sound, volume or level to try match a changing scene or an enviroment to the certain point in sound.
I found this task to be simple and quite pleasent and its professional level is top marks.

Thursday 11 April 2013

3D modeling plan (unit 66)

Intentions:

My intention for my 3D studio max modelling is to make a model of a building for the selected area and have the camera circle around it, like a profile video and having a voice over talking about the history/ building/ area. For the united reform church I'm going to have the camera to start of at the gate, I'm am then going to have the camera go up to the front of the church from this point I will have the camera go anti-clock wise circling the church and maybe have narrator talk about the church, about the history. While circling around the building  I will stop at key points around the church talking and showing these’s key points.  As well as circling the area I will circle it at different levels to show off the building. For the environment around the area I was thinking of having some planes placed around the church and place pictures of the surrounding area placed on the planes. My idea for the 3D studio max trailer for the client is to have is to have some sort of ‘Adjustment Bureau’, ‘inception’ type thing going on, so we could jump from key buildings to an instant like for example when your inside one of these key buildings and then you open the door you instantly  outside another key building, so we can have this type of idea and still keep everything true and realistic. So were having the starting point at Hurst locks and depending how bad our modelling is for the buildings we’ll start with the worst and finish off with the best so it doesn’t look that bad at the end, know I was thinking that we have Hurst lock and Shipley wharf all in one and that we have the camera from a birds eye point of view (assassins creed eagle being the camera) looking over these two keys points high above  so we can quickly get them out of the way and it would be easy so we don’t have to go into great detail on these key areas and we would be able to put more concentration into the buildings, I'm not just saying this to skip a lot of hard work but besides that i do think this would be a real great way to open up with, from the camera prospective it would real beautiful and symbolic or some shit like that.  Once were done looking down from above we quickly zoom in to a particular building, say the warehouse and we do a 360 degree turn around the building at different levels and point out any key bits and then finish off having a quick look inside the building, once were done looking and talking about the building we’ll have some sort  quick jump (each one being different) that connects a building to another, so we’ll have a door that opens up and reveals the next building or a picture or some sort of different and interesting way of quick jumping to another building and when we get to these buildings we winced and repeat the same process that we did with the warehouse to the other buildings.

Ideas:

Idea-1:- My idea for my 3D modelling for my environments is to have a camera to just go around the environment, just having a look around as if you were in the environment yourself.
Idea-2:- My idea was to have the opening scene on the canal looking real peaceful, carm and boring, as if nothing was going to happen, then out of the blue have a jet ski jump over the canal lock or smash through it, going through the air and crashing then exploding on contact on a canal boat for something total awesome but random.
Idea-3:- have the surrounding scene look as if its aging in time our maybe going back in time as if it was about to show you something that happened here at a certain time or age. when that's done have a strange shadow or object go past the camera but not revealing what it is just yet then have the camera span out to a wider view of what's going on, to reveal a ship, a pirate ship or some sort of ship that looks like its ready for battle. (what I wanted the ship to kind of look like was 17 century but maybe add something that makes it a bit futuristic.) Then I want the camera to span out some more to reveal an even wider shot of what's going on and to see the ship to go towards an impending water fall and then to have the camera to cut to a shot at being at the edge of the water fall having the ship come towards the camera then the camera cuts to behind the ship following it towards the water fall and to have the ship fall of the water fall, then a couple of seconds pass to then reveal the ship has transformed in a flying vessel. (something like off the most recent three musk a tears or what ever.) Once the ship has transformed and has a 360 degree look around it fly's off to another area were it has battle with another or a couple of over flying ships after some close ups of the ships getting ready for battle they start to firer on one another, (this part of the animation will contain explosion on each of the ships, with some explosion in mid air or some sustaining heavy damage that they fall apart and let gravity take its part with the camera following some of the debre. In the mist of battle something opens up in the clouds to reveal the united reformed church. (near Shipley college)(an alternative we use one of the mills so we don't accidently p*** of some Christian like the game resistance) All of a sudden a lightening beam shoots up into the sky and opens up a portal. (end scene),(the ships either goes into the portal or something comes out of it.)

Photo's

How I kick started this whole thing is I went out on an outing one day and took some pictures of the individual buildings that my team had to do, these building were the united reformed church, new & salts mill, warehouse, shipley wharf and hirst lock, doing this gave me a greater prospective of how these buildings look in greater, thanks to these pictures I was able to find out how many windows there were, in-dents, I was able to even get a one/two point prospective on some of these areas, all there bits detail that needed my atention on my models.

Here are a montage of pictures I took of the united reformed church, with these pictures I was able to tell the number windows I needed to input on to my 3D model as well as coloums, doors, steps and in-dented bits.

These pictures here are pictures of hirst lock, with these pictures I was able to tell the amount of windows, how many of these stickie out building things there are, as well as theses pictures helping me map out the building it also helps me to map out the enviroment say the canal, with it I'm able able to tell that the colour of the canal is a dull brown colour and that there is a bit of organic life form around the foot path near the canal. looking at some of these pictures it helps to in a one point prospective, which is a great way to plan out your enviroment, from looking at it at one end of the canal to the other as well as doing this on the oppisit side of these buildings in hirst lock, on the road.


Taking these photo's help me a lot to plan out my enviroment that i was going to design in 3D studio max, I was able to plan a head so I knew what object I was going to use in 3D studio max (planes, boxes, windos, cylinders) and the amount of segment that I estimated that I needed to use. As well as being able to plan out a head It gave me the idea of what I could just show off so I wouldn't have to design the whole area which saved me time so I could design the rest of my models.


When I went on my outing taking pictures of these buildings I also took pictures of some textures to either use or to get an idea of what to look for, when I tried to use these pictures on my enviroments they didn't seem to look the same way as it did when i saw the buildings, it look wrong, none of these textures look right against the enviroments, it made it look more fake, In my eyes it didn't look real enough, In my eyes it needed a bit more colour a bit life in it. 

Concept work


This concept work of shipley wharf, as one point prospective. Doing this as a one point prospective help in a great deal to drawing out shipley wharf, i choose to do this as a one point prospective because shipley wharf can be seen as one point prospective.
This is concept of shipley wharf, as a one point prospective in full colour


This is concept work of the united reformed church, as two point prospective in full colour. doing this as a two point prospective help designing this out, it can been seen as two point prospective from a corner or at a angle.

This is a piece of concept work of the united reformed church, as two point prospective but if it was a giant portal laser opening thing.

Concept work of united reformed church, as two point prospective but designed with an assassins creed concept in mind.

 
concept work of united reformed church, this a profile pictures I've done so I can see it at all angles and get a better understanding.
 
 Concept work of united reformed church


Two point prospective work.
 
Thanks to the photos taken I was able to get some concept art work done with out consantly going out and doing it, with the aid of these photo's I was able to draw a better design in greater detail as well as some unique designs of my own.
Thanks to doing these concept work I get a better feel for what I was making in 3D studio max.
I found the whole concept side slightly tricky as ain't that good at drawing, but i can get the job done, and pointless as I already knew what I needed to do and what I wanteed to do although it did give easier way to look at that made it easier to design.
 
3D Modelig
URC-front entrance
 
This link here is a video of my 3D studio max model of the united reformed church.
 
When i Started to make this model I started withe the front entrance which was built entirely out of  the object Cylinders, first of I started to make the stairs, I look at an iamge of the united reformed church to see the amount of steps there were (5) so I drew out the first cylinder for the first step, the width of that first cylinder was going to be the width of the entire building, I left that cylinder as a full cylinder as it would be the inside stairs of the church I then made four copies of that cylinder each one getting smaller & smaller piled on top one another, I did this by selecting the drawn out cylinder and holding down shift and pulled out another one, once I finished the stairs I made work on the coloums for this i drew out one cylinder and copied it four times and put them into place After that I made work on the roof I drew out a cylinder bigger the bottom stair went on to edit mesh, selected polyies, extruded it upwards then I extruded that bit outwards, I then selected the bitty poly thing and high-lighted half of it and deleted half of it because that the shape of the roof, I then selected the centre point of the roof and raised it up a wee bit. After the roof building I then had to construct the mini little tower thingie on top of the church This was built out one big cylinder and eight smaller ones around the big one then on top of that was an overall shape which i then add a small cone a top of the tower to finish it off. For the door way frame/entrance bit I drew out a cylinder that had the exact same hight difference between the floor of the church and the roof and using edit mesh I selected half and then deleted that half, I then drew out two planes the exact same size to fill in the gaps for the entrance, using edit mesh I deleted some polys to outline where I would place the doors on both planes and cylinder, and thats the front entrace of the church done.

URC-walls & roofs

For the wall I drew out a plane that was 19 by 19 segments into which I enlined it to the exact same hight as the front entrance, I lenght it out to I felt comfortable with the size of the wall, using edit mesh I tried to shape my wall by extruding and lining up to as close as the real deal, I then extruded some segments to outline where the windows were gonna be placed I then copied that entire wall and placed it on the oppisite side of original wall so know I had an inside wall, (luckly everything en-line to the orignal) I then selected the both walls and copied them to the oppisite side of the church so know I have two fully constucted walls, from one of the walls I extrude the line of the wall only half way across the church to create half of the roof I then moved the roof around to make it look more roof like I then did the exact same thing on the oppisite side.

URC-Intrier & extra

For intrier decarating I made benches, an orgen and some pritty shinie shanderliers, I made the benches out of a plane, did it by 8 by4 segments, using edit mesh I lined up the bits to so it would look right when I extruded it, I then extrude out the bench legs, arm rest and the layback thing After that I tried to make as many copies as I could fit in the church without making the size of the bench or the amount look ridiculous. I then started work on the orgen, this was a simple matter of object placing, I drew out a box for the main part of the organ I then drew out sevral cylinders asending & desending in hight for the over organie bits I then made a little keyboard and chair out of a planes and cylinders. I started work on the windows I drew out one to the exact size of the out lined
 window and made five more copies and then copied those six for the other side of the church, I then made work on the shanderliers which consisted of a cylinder, a cone and half a sphere, I first drew out a sphere and using edit mesh I deleted the top half of the sphere, I then drew out a cone and shape so the bottom radius of the cone would match the radius of the sphere and then I attached a thin cylinder and increase the hight of it until the cylinder toch the roof I then made anothe copy of the shanderlier. From this point my united reformed church was pritty much done all that was left know was the back of the church, the lighting, the opacity for the windows, the enviroment, I started off my making the back of the church, I drew out a plane to the exact width of the church and using edit mesh lined it up so it would fit the ouline of the church, know for techniuqle reasons I don't know I had to mack an exact copy of that wall to put on the oppiste side of that wall because some reason when you draw out a plane for some reason the oppiste side doesn't show up and you can see right through it, this proved to be a problem but not solvebleand also at the back of the church I had to input half a cylinder, at the left side of the church was this little tiny building that I made out of a little box I then using edit mesh grab the top part of the box to give it more pointy house like shape, After that I started to work on the enviroment around the church this consisted of two planes, one for the tarmac road which I latered shape using edit mesh and the other for naturel which later using edit mesh shape the natural plane to make it look more geographical. After all this I started to add in textures to make my whole enviroment that bit more realistic, I added a grass, tarmac, building block and then I made a uniqe texture where I lowered the opacity to fithty percentand added it to the windows so know you can see through them, I also add a sky texture to the whole background. After I did this I started to mess with the lighting were I add something called the Omni x2 inside the church to make them look like light bubles and four ouside on ready make light post.

Shipley wharf
http://www.youtube.com/watch?v=0_aeEk5ei3Q
This is a link to the Shipley wharf environment

To start off this 3D model I started of by making the red building that building was the centre point of my model, I made it by drawing out a box, 4x4, using the line segments I shape my box  into more of a house like shape making it more smooth I then duplicated it by holding down shift and and dragging out another copy for the other side, I then started work on the glass roof for this I drew out a plane that was the exact same size as one of the spaces on one side of the roof I then copied that one by holding down shift dragged it out for the other side of the roof and then rotated it to enline with the building, I then pressed 'M' so I could use the texture, I click on one sphere and lowered it oppacity to 50%, I then dragged that texture onto the two planes that would act as my glass roof. I then added four coloums for the front & back entrance of this building I did this by drawing out a cylinder to the exact same height as the lowest point of the glass roof I drew out the first four Then selected those four and placed another set of four on the other side.

After all that I then started work on the building that went up and down the canal side, as well as the buildings that went up and down on the road, this was actually easier then antisipated because all the buildings that went up and down the canal were exactly the same, I first drew out a box that was the exact same height and lenght as those red building that were drawn out earlier as well as the roof shape, I did however extended the width of that box into more of the same width of a house by my judgement, with these house though there was a big chunk of a building that was hanging off the side of the building, so that what I had to work on next using edit mesh, using the square panel tool I extruded out of the side of the building the building chunk that would hang over the canel, Doing this made an easy job into making a roof for this chunk of building, using line segments I selected the middle line of of the roof of this extrusion and extruded it to enline with the roof of the main building. After I made this I realised I made a bit of an error, that when I wanted to texure this building that the whole thing would look the same so to fix this problem I simple copied the entier building by holding shift and then dragging out another building, I then deleted everything on that building except for the roof bit I then attached that roof on to the original building so know I can have different textures for the roof and the main building, to finish of this building I deleted some segement so I knew were to place the doors and then placed some doors and Indented certain parts of the building so I knew were to place the windows, I did this by selecting segments and extruding them in-wards and then placed windows in those slots. I then started work on the gutters and pipes that lay rest on the side of the building, to do this I selected the object railings which were great objects that gave of the illusion of pipes and gutters either way I place these railings along build as they were in real life. After creating this one building I then copied more of these by holding down shift and dragging more out and placed as many as I needed or as many as I was going to show off.

I started work on the road I drew out a plane as long from the first building to the last building on the oppiste side, I then got a picture of the road off the inter-web so I could us it as a texture for the plane I just drew out, I applied my texture onto my road and I had my road, On the oppiste side of the road I had to use something to block off the open enviroment view so what I did was copied one of my buildings on the other side and moved it to the oppiste side I then copied sevral more to place alon g the road to try and block off the rest of the open enviroment or try to block off the bits I did want anyone to see. At the end of the road I placed a plane that block off the gap between these two buildings and on this plane I placed a one point prospective picture of a road to give off the illusion that the road continues, thats the entire right side of the enviroment completed. To make the canel on the other side of the canel I first drew out a plane to my liking, I then extrude a canel, using the segment, that was big enough to fit in a plane were I could place the texture of a canel in order to create the canel bit. on the oppiste side of the canel I placed several trees and a massive plane with the texure of grass obtained from the inter-web to try and hide most of the open view, going back up the canel I place a plane where I place a one point prospective picture of a canel to give of the illusion that it contiues on.

Out of the two models I made here I found the shipley wharf enviroment to be the most easiest because after a while it became a simple matter of copieing and pasting but I'm most proud of my united reformed church 3D model because that is real the most detail and the one model where I put most of my effort into it and its my favourite.

Reflection

In my opinion I feel that I reach my highest peak in my ability but I think I need to improve on my patience or my timing in the near future, I feel that in some of models that i may have rushed it a bit leaving it a bit un-tidy some areas, like the texture being the wrong texture, little gaps between the buildings, just little mistakes.

I'm not really shore what skills to improve, I think I need to improve on the more technical side, because i struggle a bit to remeber bits and bobs, like the texturing and lighting because it hard to try and get get them prefect, changing there settings.

In general everything but i had a few problems when I was doing my 3D model because sometimes it crash randomly due to the amount of memory I had on my computer.

My computer kept crashing every know and then and the fact that we had the lowest amount of members in our team to start of with and then one of them left, we had a lot of work to do, like the project and over pieces of work along the way while catching up on other pieces of work, it just seem like an unfair amount on such a small team.

I managed my time well by doing bits of work when I got home and coming into college on my free time when I needed to.

I would say with all the work I've done that I have travelled pritty far, that my mind has expand its amount knowledge.

I am confident with everything that I've learned, meaning all the technoligy and software I've used through ou the years, :-3D max, flash, photoshop, movie maker, monkey jam, sound recording equipment, tablets, computers, evrything taht i have used and learned about.

I did get the desired outcome, the project got successfully completed and I even had time to complete my own video game trailer so I would say everything came out well.

Everything that we did for the Multi-Water story project I would say we did it like a real profession (like a boss), I reckon that we did everything the same way a profession would of done it, the research, the concept work, planning, organising showcase, T-shirts, teamworking, 3D modeling, everything.

Thursday 21 March 2013

3D Studio max animation

Offically I've done all animation in my 3D studio max models, they aren't the finals animation there just mocks to say I've done the animation, the final animation will start soon.
When I started filming these animation I had a bit of trouble with the timing, the speed at which the video went at but after a few times experimenting I had a good estimate at what I needed to aim for to get the right timings.

The animation above is the animation of hirst lock.  At first I had the idea of how I was going to do this, at first I had the camera postion at the near the swing bridge so the camera would just walk a cross it, about half way across it would then have a look around the surronding area, it would then continue a cross the bridge and the start to head down the canal into which it would have a quick nosie in the lock and then continue down the canal down the hill, About half-way down the the path it would then have another quick look around the surronding area and then end.
The animation above is the animation of part of a building of new & salt mill.
The video here is just a real quick 360 degree pan shot of part of building from the mill.
The animation above is the animation of part of a building of new & salt mill.
The video here is just a real quick 360 degree pan shot of part of building from the mill.
The animation above is an animation of shipley wharf.
When I started to do this animation I wanted the camera to feel like it was just flying around like a bird so I tried it on this to see what it would be like, I had the camera fly down the street and then made it turn left and fly through this building and then have the camera fly back up the canal and then lift off into the air.
This animation here is the animation of the united reformed church.
I had the camera started staring at the front of the church then I had the camera walk around the church looking up and down while doing so the I had the walk inside of the church just having a look inside, which is pritty much it.